How to Make Homemade Cat Treats
Are you tired of store-bought cat treats that are filled with questionable ingredients? Do you want to spoil your feline friend with something special, while also ensuring it’s healthy? Well, you’re in luck! Making homemade cat treats is not only fun but also incredibly rewarding. It allows you to have full control over what goes into your cat's diet, ensuring every bite is both delicious and nutritious.
Imagine your cat's eyes lighting up as you present them with a treat that you made with love. The best part? You can customize the flavors and ingredients to suit your cat's preferences and dietary needs. Whether your kitty loves fish, chicken, or even pumpkin, there’s a treat recipe out there that will make their taste buds dance with joy. Plus, creating these treats at home can save you money in the long run. Instead of constantly buying expensive, pre-packaged options, you can whip up a batch of homemade goodness in your own kitchen.
In this article, we’ll guide you through the entire process of making homemade cat treats from scratch. You’ll learn about the benefits of homemade treats, the essential ingredients you’ll need, some simple recipes to try, and even tips for baking that will make your treats irresistible. So, grab your apron and let’s get started on this culinary adventure for your furry friend!
As you embark on your journey to create delightful treats for your cat, you might have a few questions. Here are some common queries that fellow cat lovers often ask:
- Can I use human food ingredients? Yes, but make sure they are safe for cats. Ingredients like chicken, fish, and certain vegetables are great options.
- How long do homemade cat treats last? Typically, they can last about a week if stored in an airtight container in the fridge.
- Can I freeze homemade cat treats? Absolutely! Freezing them can extend their shelf life. Just make sure to thaw them before serving.
- Is it safe to use catnip in treats? Yes, catnip is safe and can even enhance the flavor of your treats!
Benefits of Homemade Cat Treats
When it comes to our furry companions, we all want the best for them, don't we? That's where homemade cat treats come into play! One of the most significant benefits of making treats at home is the control over ingredients. Unlike store-bought options, which often contain fillers and artificial additives, homemade treats allow you to choose only the finest ingredients. This means you can avoid harmful substances that could upset your cat's stomach or lead to allergies.
Another advantage is cost-effectiveness. Have you ever looked at the price tag on those fancy cat treats? Yikes! Making them at home can save you a pretty penny, especially if you have a cat that loves to snack. Plus, you can make larger batches and store them, ensuring you always have a delicious option on hand without breaking the bank.
Beyond financial savings, homemade treats also allow you to cater to your cat's specific dietary needs. Whether your kitty is on a special diet due to health issues or simply has preferences (who doesn't love a picky eater?), you can customize the ingredients to suit their requirements. For instance, if your cat is allergic to chicken, you can easily substitute it with turkey or fish in your recipes. This level of customization is hard to achieve with mass-produced treats.
Moreover, there's something incredibly rewarding about baking for your pet. The bonding experience that comes from making treats together can significantly enhance your relationship. Imagine your cat watching you with those big, curious eyes as you mix ingredients or roll dough! Not only does it create a fun atmosphere, but it also allows you to be more involved in your cat's diet and health.
Lastly, homemade cat treats can often be healthier. You can incorporate nutritious ingredients like oats, pumpkin, and fish oil, which are great for your cat's skin and coat. Plus, you can avoid unnecessary sugars and preservatives. This means you can feel good about every treat you give your furry friend, knowing that you're contributing positively to their health.
In summary, the benefits of homemade cat treats are numerous and compelling. From ingredient control and cost savings to customizing for dietary needs and enhancing your bond, making treats at home is a fantastic option for any cat owner. So why not roll up your sleeves and get baking? Your cat will thank you!
Essential Ingredients
When it comes to whipping up homemade cat treats, the ingredients you choose can make all the difference. Not only do you want your feline friend to enjoy the treats, but you also want to ensure that they are packed with nutrition. Think of it this way: just like we wouldn’t want to eat junk food all the time, our cats deserve better than store-bought treats filled with fillers and preservatives. So, what should you include in your homemade concoctions? Let’s dive into some that will have your cat purring for more!
First and foremost, protein is a must-have. Cats are obligate carnivores, which means they thrive on meat. You can use ingredients like chicken, turkey, or even fish. Not only do these options provide the necessary protein, but they also offer a flavor that most cats can’t resist. Imagine the joy on your cat’s face when they get a taste of real meat in their treats!
Next up, let’s talk about whole grains. While cats don’t need grains in their diet, incorporating a small amount can provide some beneficial fiber. Ingredients like oats or brown rice can be great additions. They help with digestion and can keep your cat feeling fuller for longer. Just remember to use them sparingly; a little goes a long way!
Don’t forget the healthy fats! Ingredients like fish oil or chicken fat can be fantastic sources of omega-3 and omega-6 fatty acids, which are essential for maintaining a shiny coat and overall health. Just think of it as a little boost of goodness that keeps your kitty looking fabulous!
Another ingredient that can add some flair to your treats is pumpkin. Not only does it provide a nice flavor, but it’s also packed with vitamins and fiber. Plus, it can help with your cat’s digestion. Who knew that a simple squash could be so beneficial? You can easily find canned pumpkin (just make sure it’s pure pumpkin without added sugars or spices) to mix into your recipes.
Lastly, let’s not overlook the flavor enhancers. While you want your treats to be nutritious, a little something extra can make them irresistible. Catnip is a great addition that many cats go crazy for. Not only does it add flavor, but it also provides mental stimulation. It’s like a little party in a treat! You can also consider adding a touch of chicken broth or beef broth to give your treats an extra savory kick.
Here’s a quick overview of some essential ingredients you might want to consider:
| Ingredient | Benefits |
|---|---|
| Chicken/Turkey/Fish | High in protein; great flavor |
| Oats/Brown Rice | Provides fiber; helps with digestion |
| Fish Oil/Chicken Fat | Source of essential fatty acids |
| Pumpkin | High in vitamins; aids digestion |
| Catnip | Adds flavor; provides mental stimulation |
By carefully selecting these ingredients, you can create treats that are not only delicious but also nutritious. Your cat will thank you with every purr and headbutt!

Simple Recipes to Try
When it comes to treating your furry friend, nothing beats the satisfaction of crafting homemade cat treats right in your kitchen. Not only do you get to control the ingredients, but you also get to whip up flavors that your cat will adore! Here are a couple of simple recipes that are sure to make your feline friend purr with delight.
1. Chicken and Pumpkin Treats
This recipe combines the irresistible taste of chicken with the nutritious benefits of pumpkin. Cats love the savory flavor, and pumpkin is great for their digestion. Here’s how to make them:
Ingredients:
- 1 cup cooked chicken, shredded
- 1/2 cup pumpkin puree (not the spiced pie filling)
- 1 cup oat flour
- 1 egg
- A pinch of catnip (optional)
To prepare, simply mix all the ingredients in a bowl until you have a dough-like consistency. Roll out the dough to about 1/4 inch thick and cut it into fun shapes using cookie cutters. Place the treats on a baking sheet lined with parchment paper and bake at 350°F (175°C) for about 20 minutes, or until they are golden brown. Let them cool before serving!
2. Tuna and Cheese Bites
If your cat is a seafood lover, they will go crazy for these tuna and cheese bites. They are easy to make and packed with flavor. Here’s what you’ll need:
Ingredients:
- 1 can of tuna in water, drained
- 1/2 cup shredded cheese (cheddar or mozzarella works best)
- 1 egg
- 1 cup whole wheat flour
Start by preheating your oven to 350°F (175°C). In a mixing bowl, combine the drained tuna, shredded cheese, and egg. Gradually add the flour until a dough forms. Shape the dough into small balls and place them on a baking sheet. Bake for about 15 minutes or until they are firm and lightly browned. Cool them off before giving them to your cat!
These recipes not only provide a tasty snack for your kitty but also allow you to sneak in some nutritious ingredients. Feel free to experiment with different flavors and ingredients to find out what your cat loves the most. You can even consider adding a little catnip to the mix for an extra kick!
Remember, while these treats are a delightful addition to your cat's diet, they should be given in moderation. Treats are just that—treats! They shouldn't replace a balanced diet. Always keep an eye on your cat's overall health and consult your veterinarian if you have any concerns.
Now that you have some delicious recipes to try, why not gather your ingredients and get baking? Your cat will thank you with purrs and cuddles!
Q: How long can I store homemade cat treats?
A: Homemade cat treats can typically be stored in an airtight container for up to two weeks at room temperature. For longer storage, consider refrigerating them for up to a month or freezing them for up to three months.
Q: Can I use different types of meat for the treats?
A: Absolutely! You can use turkey, beef, or even fish. Just make sure that the meat is cooked and free from any seasoning or additives that could be harmful to your cat.
Q: Are there any ingredients I should avoid?
A: Yes, some ingredients can be harmful to cats. Avoid using onions, garlic, chocolate, and anything with artificial sweeteners like xylitol. Always check with your vet if you're unsure about specific ingredients.
Q: How do I know if my cat likes the treats?
A: The best way to find out is to simply offer them a treat! Watch their reaction—if they eagerly munch it down and come back for more, you’ve hit the jackpot!
Tips for Baking Cat Treats
Baking cat treats at home can be a delightful experience, but there are some essential tips to keep in mind to ensure that your furry friend enjoys every bite. First and foremost, always use high-quality ingredients. Just like humans, cats can taste the difference between fresh and stale ingredients. So, make sure your meats are fresh, your vegetables are ripe, and your grains are wholesome. This not only enhances the flavor but also maximizes the nutritional value of the treats.
Another key tip is to measure your ingredients carefully. Baking is a science, and the right proportions can make all the difference in texture and taste. For instance, if you're using flour, too much can result in dry and crumbly treats, while too little can make them too soft. A good rule of thumb is to follow a recipe closely the first time you try it, and then adjust to your cat's preferences in future batches.
When it comes to baking time, keep a close eye on your treats. Cats have a keen sense of smell, and they’ll let you know when something smells delicious! However, overbaking can lead to hard, unappetizing treats. A good tip is to start checking them a few minutes before the recommended baking time. If they turn golden brown and feel firm to the touch, they’re likely done. Remember, you want them to be crunchy but not rock-hard!
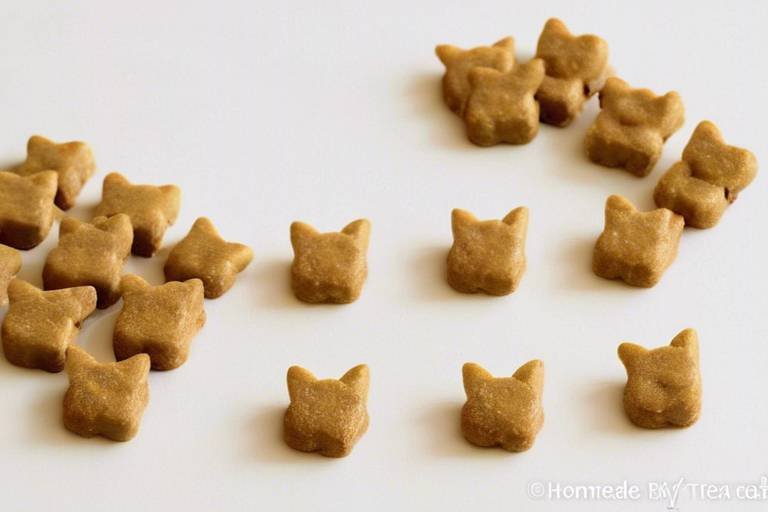
For added flavor and appeal, consider experimenting with different shapes. Using cookie cutters in fun shapes can make the treats visually appealing, and your cat will be more excited to try them. Just remember to keep the shapes small enough for your cat to chew easily. If you’re feeling creative, you can even create layered treats by combining different mixtures. This not only makes them look gourmet but also adds a variety of flavors that your cat will love!
Lastly, don’t forget about cooling and storage. Once your treats are baked, allow them to cool completely on a wire rack. This helps to maintain their texture and prevents moisture from building up, which could lead to spoilage. Once cooled, store them in an airtight container to keep them fresh. If you’ve made a large batch, consider freezing some for later. Just remember to label the containers with the date so you know how long they’ve been stored!
In summary, the key to baking irresistible cat treats lies in using quality ingredients, measuring accurately, monitoring baking times, getting creative with shapes, and storing them properly. With these tips in mind, you’ll be well on your way to creating delightful snacks that your feline friend will adore!
Q: Can I use regular flour for cat treats?
A: While regular flour is okay, consider using whole wheat or oat flour for added nutrition.
Q: How long can I store homemade cat treats?
A: Homemade cat treats can last up to two weeks in an airtight container at room temperature. For longer storage, freeze them for up to three months.
Q: Is it safe to use fish in cat treats?
A: Yes, fish is safe and can be a great source of protein. Just ensure it’s cooked and deboned before adding it to the treats.
Q: Can I add vegetables to cat treats?
A: Absolutely! Cats can benefit from certain vegetables like carrots or peas, but make sure they are cooked and mashed for easier digestion.
Storing and Preserving Treats
Once you've put in the effort to create delicious homemade cat treats, the last thing you want is for them to go stale or spoil before your furry friend gets to enjoy them. Proper storage is key to maintaining the freshness and flavor of your treats. First and foremost, it's essential to let your treats cool completely before storing them. This prevents moisture from building up inside the container, which can lead to mold or a soggy texture that your kitty will definitely not appreciate!
For optimal freshness, consider using airtight containers. These can be plastic or glass jars with a secure lid. They not only keep the treats fresh but also prevent any unwanted odors from seeping in. If you’ve made a large batch, it might be a good idea to divide them into smaller portions. This way, you can keep some treats in the fridge or freezer for later use while having a fresh batch available for your cat to munch on daily.
Your homemade treats can generally be stored in the pantry for about a week, but if you want to extend their shelf life, refrigeration is your best bet. In the fridge, they can last up to two weeks. For longer storage, freezing is the way to go! Just make sure to place the treats in a freezer-safe bag or container, and they can last for up to three months. When you’re ready to serve them, simply thaw them in the fridge overnight or let them sit at room temperature for a bit.
Here's a quick reference table for storing your homemade cat treats:
| Storage Method | Duration | Notes |
|---|---|---|
| Room Temperature | 1 week | Use airtight container. |
| Refrigerator | 2 weeks | Keep in an airtight container. |
| Freezer | Up to 3 months | Use freezer-safe bags or containers. |
Remember, the key to preserving the quality of your cat treats lies in keeping them away from moisture, heat, and light. Always check for any signs of spoilage before giving them to your cat. If they smell off or look different than when you made them, it’s best to err on the side of caution and toss them out. Your cat deserves only the best, after all!
Q: Can I store treats in the same container as other foods?
A: It's best to keep your cat treats separate from other foods to avoid contamination and preserve their unique flavor.
Q: How can I tell if my treats have gone bad?
A: Look for any unusual smells, changes in texture, or visible mold. If in doubt, throw them out!
Q: Is it safe to freeze treats with meat ingredients?
A: Yes, as long as they are stored properly in an airtight container, frozen meat-based treats are safe for your cat.
Customizing Treats for Dietary Needs
When it comes to our furry friends, one size definitely does not fit all, especially when it comes to their diet. Just like humans, cats have unique dietary needs that can vary based on their age, weight, and health conditions. Customizing homemade treats for your cat can not only enhance their enjoyment but also cater to their specific health requirements. Imagine being able to whip up a treat that not only satisfies their taste buds but also helps manage their weight or allergies. Sounds great, right?
First off, it's essential to know what your cat's dietary restrictions are. For instance, if your cat is overweight, you might want to focus on low-calorie ingredients. On the other hand, if your kitty has allergies, avoiding common allergens like wheat or certain proteins is crucial. Here are some key points to consider when customizing your cat treats:
- Protein Sources: Cats are obligate carnivores, meaning they thrive on protein. Use lean meats like chicken or turkey, or even fish like salmon, which is rich in omega-3 fatty acids.
- Grain-Free Options: If your cat is sensitive to grains, opt for recipes that use alternatives like pumpkin or sweet potatoes, which are not only safe but also nutritious.
- Low-Calorie Ingredients: For cats that need to shed a few pounds, consider using ingredients like plain yogurt or pureed vegetables. These can add volume without the extra calories.
- Supplementing with Nutrients: If your cat has specific health concerns, such as joint issues, consider adding supplements like glucosamine to the treats. Always consult your vet before adding any supplements.
To give you a better idea, here’s a simple table outlining some common dietary needs and suitable ingredients:
| Dietary Need | Recommended Ingredients |
|---|---|
| Weight Management | Lean meats, pumpkin, green beans |
| Allergies | Fish, sweet potatoes, quinoa |
| Joint Health | Chicken, glucosamine supplements, omega-3 oils |
| Digestive Health | Pumpkin, plain yogurt, probiotics |
Remember, the goal is to create a treat that not only delights your cat but also supports their health. It's all about finding that balance! Additionally, you can experiment with flavors and textures to see what your cat prefers. Some cats might love crunchy treats, while others may prefer softer ones. Don't hesitate to get creative, and most importantly, have fun with it!
Lastly, always keep an eye on your cat's reactions to new ingredients. If you notice any adverse effects, it's best to consult with your veterinarian. Customizing treats can be a rewarding experience, ensuring your cat gets the best of both worlds: deliciousness and health!
Q: Can I use human food in cat treats?
A: Absolutely! Many human foods are safe for cats, but always ensure they are cat-friendly and free from harmful ingredients like onions or garlic.
Q: How often can I give my cat homemade treats?
A: Treats should only make up about 10% of your cat's daily caloric intake to maintain a balanced diet.
Q: What if my cat has specific health issues?
A: Always consult with your veterinarian before introducing new ingredients or treats, especially if your cat has health concerns.
Q: How can I make sure my cat enjoys the treats?
A: Experiment with different flavors and textures. Involve your cat in the process, and watch their reactions to find out what they love the most!
Using Catnip in Treats
Ah, catnip! That magical herb that can turn even the most aloof feline into a playful ball of energy. If you're thinking about incorporating catnip into your homemade cat treats, you're onto something fantastic! Not only does catnip add a delightful flavor that most cats adore, but it also offers a variety of benefits that can enhance your kitty's overall experience. Imagine your cat, eyes wide with excitement, as they savor each bite of a treat infused with this aromatic herb. It’s like giving them a little party in their mouth!
So, why should you consider using catnip in your treats? For starters, catnip is known to stimulate a cat's senses. When cats come into contact with it, they may exhibit behaviors such as rolling, purring, and playful antics. This natural reaction is due to a compound called nepetalactone, which binds to the receptors in their nasal tissue and can produce a euphoric effect. Incorporating catnip into your treats is not just about flavor; it's also about providing a sensory experience that can enrich your cat's life.
Besides the fun factor, catnip can also promote mental stimulation. Just like humans enjoy a good puzzle or a challenging game, cats benefit from engaging their minds. Treats infused with catnip can encourage your furry friend to play and explore, keeping them active and entertained. This is especially important for indoor cats who might not get as much exercise as their outdoor counterparts. Think of catnip as a little boost to their daily routine, making treat time a delightful adventure!
When making your homemade cat treats, adding catnip is quite simple. You can either use dried catnip or even fresh catnip, depending on what you have available. Here's a quick guide on how to incorporate it:
| Type of Catnip | Usage | Notes |
|---|---|---|
| Dried Catnip | Mix into the dough or sprinkle on top before baking | Best for a concentrated flavor |
| Fresh Catnip | Chop finely and mix into the dough | Adds a fresh aroma |
Keep in mind that while catnip is generally safe for cats, moderation is key. Not all cats respond to catnip, and those that do can become overly excited if given too much. It's a good idea to start with a small amount in your treats and observe how your cat reacts. If they seem to enjoy it, you can gradually increase the quantity in future batches. Just like with any treat, balance is essential!
In conclusion, adding catnip to your homemade cat treats can transform an ordinary snack into an extraordinary delight for your feline friend. It's not just about taste; it's about creating an experience that can bring joy and playfulness into their day. So, roll up your sleeves, get creative in the kitchen, and watch as your cat revels in the magic of catnip-infused treats!
- Is catnip safe for all cats? Yes, catnip is safe for most cats. However, some cats may not react to it at all.
- Can I use too much catnip in treats? Yes, moderation is important. Too much catnip can lead to overstimulation.
- How can I tell if my cat likes catnip? Look for signs such as rolling, purring, and playful behavior after exposure to catnip.
- Can kittens have catnip? It's best to wait until they are around 6 months old to introduce catnip.
Involving Your Cat in the Process
Making homemade cat treats can be a delightful bonding experience between you and your feline friend. Imagine your cat curiously watching you as you gather ingredients, their tail twitching in anticipation. Involving your cat in the process not only makes treat-making more enjoyable but also allows them to engage their senses and instincts. So, how can you invite your cat into this culinary adventure? Here are a few fun ideas!
First off, let’s talk about ingredient selection. When you’re planning to make treats, why not let your cat be part of the decision-making process? You can lay out a few different ingredients—like chicken, tuna, or even pumpkin—and see which ones they gravitate towards. It’s like a mini taste test right in your kitchen! You might be surprised to see how picky or adventurous your kitty can be.
Once you've settled on the ingredients, it’s time to get cooking! You can create a cozy space in the kitchen where your cat can comfortably observe the action. Cats are naturally curious, and they love to watch their humans at work. You could even let them sniff the ingredients as you prepare them, adding to their excitement. Just be sure to keep any harmful ingredients out of reach, as safety should always come first!
Another engaging activity is to let your cat “help” with the mixing process. Depending on your cat’s personality, you might find that they enjoy being near you as you mix the dough. You could even set aside a small portion of the mixture for them to taste as you go along. Just be cautious and ensure that any ingredients you’re using are safe for your cat to consume. This little taste test can make your cat feel like they’re part of the team, and it’s a great way to reinforce their excitement about the treats.
After the treats are baked and cooled, it’s time for the ultimate reward—taste-testing! This is where the real fun begins. Watch your cat’s reaction as they sample the fruits of your labor. You might notice their eyes widen in delight or hear a satisfied purr as they enjoy the treats. This moment not only reinforces the bond you share but also gives you valuable feedback on your homemade creations. If they love it, you know you’ve hit the jackpot!
Involving your cat in the treat-making process can transform a simple task into a memorable experience. It’s about more than just making treats; it’s about creating moments that strengthen your relationship. So, grab your ingredients, invite your kitty into the kitchen, and enjoy the process together. After all, the joy of making treats is only heightened when you share it with your beloved pet!
Q: Can I use any type of meat for cat treats?
A: While most meats are safe, it's best to stick with lean meats like chicken or turkey. Avoid using processed meats with additives, as they can be harmful to your cat.
Q: How can I tell if my cat likes the treats?
A: Watch for signs of interest, such as sniffing, purring, or eagerly eating the treats. If your cat seems excited and enjoys them, you’ve likely created a winner!
Q: How long can I store homemade cat treats?
A: Typically, homemade cat treats can last up to two weeks in an airtight container in the fridge. For longer storage, consider freezing them.
Q: Is it safe to use catnip in homemade treats?
A: Yes! Catnip can be a fun and safe addition to your treats, enhancing their flavor and providing mental stimulation for your cat.
Frequently Asked Questions
- What are the benefits of making homemade cat treats?
Making homemade cat treats allows you to control the ingredients, ensuring they're healthy and free from harmful additives. Plus, it can be more cost-effective than buying commercial treats, and you can tailor them to meet your cat's specific dietary needs.
- What ingredients should I use in homemade cat treats?
Key ingredients often include wholesome options like chicken, fish, pumpkin, and oats. It's important to avoid harmful additives like onion, garlic, and excessive salt. Always check if the ingredients are safe for your cat!
- Can I customize cat treats for my cat's dietary needs?
Absolutely! You can adjust recipes to cater to weight management, allergies, or specific health concerns. For instance, if your cat is sensitive to certain proteins, substitute them with alternatives that are safe and nutritious.
- How do I store homemade cat treats?
To maintain freshness, store your treats in an airtight container in a cool, dry place. You can also freeze them for longer shelf life. Just make sure to thaw them before serving!
- Is it safe to use catnip in treats?
Yes! Catnip can enhance the flavor of your treats and provide mental stimulation for your cat. Just ensure that your cat enjoys catnip, as not all cats respond to it.
- Can I involve my cat in the treat-making process?
Definitely! Involving your cat can be a fun experience. Let them sniff the ingredients, and you can even have them taste-test once the treats are ready. It makes the process interactive and enjoyable for both of you!
- How do I know if my cat likes the treats?
The best way to find out is to observe their reaction! If they eagerly come to you for more or purr while eating, you’ve hit the jackpot. If they turn their nose up, you might need to tweak the recipe!

